Angels One Six Designer Interview with Phil Yates
Heed the siren. Grab the stick. Miniature wargame godfather Phil Yates gears up for reimagined dogfighting with Angels One Six.
As a guy who loves looking at models and fantasizing about vivid battles more than I like painting or learning combat rules, I was fascinated by the claim that Angels One Six — a forthcoming WW2 dogfight miniature game from Phil Yates and Ian Bourgos — could get just about anybody up in the air.

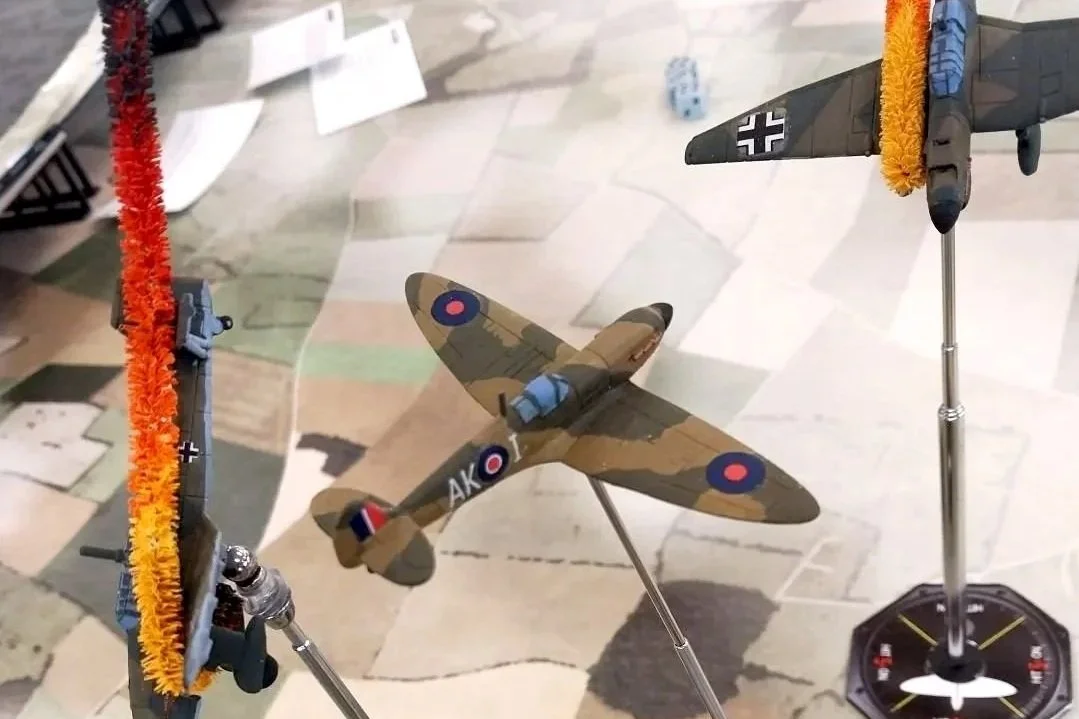
Miniature wargame mastermind Phil Yates has reimagined the WW2 dogfight and wants to drop you in to the cockpit for the Battle of Britain
As I learned in my talk with Yates — father of Flames of War and many others — beautiful pre-painted planes right out of the box were just one of many obstacles he removed between a player and a bracing dogfight that was both realistic and accessible.
He walks us through the Angels One Six system, his multi-decade quest to improve everything from how a turn was taken to the stands on which your Spitfires and Messerschmitts sit.
If early event demos in his home of New Zealand are any indication, it appears as if Yates and Bourgos have succeeded in their quest to balance technicality and story.
This fall a Kickstarter will let you and your friends cut your teeth on some famous craft from the Battle of Britain, with an eye to expanding both to late-war planes and the Pacific. No painting required. Stay abreast of the project here.
Further recommended listening for hardcore miniatures people: Check out Yates’ talks with the excellent Lead Pursuit podcast hosts if you want a deeper dive (or a steeper climb) into the making of Angels One Six.
A very different war story: Hear an interview with Chicago ‘68 designer Yoni Goldstein.
Battle Card from Postmark Games: Six Tidy and Clever WW2 Battles
Battle Card’s care in detailing, visual presentation, affordability and accessibility should endear it to non-wargamers and historical gamers looking for a fun afternoon of solo play.
This is adapted from the script of Episode 99, Battle Card Review + Meet The Lads of “War With a Mate”
When the Imperial Japanese Army hit Malaya, British Commonwealth forces — including Indian and Malayan troops — got rolled up like a taco. The Allies blew up something like 100 bridges as they fled south and the Japanese still ran them down in just over two months.
So here I sit in front of the first of six campaigns of Battle Card, a collection of WWII print-and-play titles from Postmark Games. It takes about five minutes of setup to see where the design logic and the historical situation come together on my little map, upon which sit a bunch of six-sided dice that portray the strength and position of the forces: a string of two-strength Allied units against two max-strength Japanese units.

One sheet of rules and dice that you supply get you off and running (for your life) in The Malayan Campaign, one of six WW2 “battles in a bottle” that come with Postmark Games’ Battle Card print-and-play solo game.
Looking from the Allied seat, you’re supposed to craft a successful fighting retreat — one that comes out better on your table than it did for the Brits and their cohort in real life — by rolling back down two main roads and combining strength until you find the right space to gamble on making a stand.
You want accessible? I picked up the rules in earnest for the first time last Sunday morning and logged 20 games before the day was over. Including an 11-game test because I thought I’d found an exploit where you could easily win at far north of 50%. I was wrong. I barely won the 11th-game tiebreaker.
I think it was fitting that the only colored d6s I had to use for the Japanese units were massive red novelty craps dice, because it really brought home the feeling of a massive and implacable opponent bearing down on your house of toothpicks.
You’ll soon be hauling ass down one of the two Malayan roads where the pursuing Japanese always catch up with you, forcing you into binary defend-or-counterrattack rolls.
There’s just two ways to succeed: Get one of your seven die down the road to Singapore while it’s at three strength or better, or destroy one of the two six-strength Japanese forces. None of your dice have more than two value except for one; it’s designed to be a running beatdown where you have a couple of windows to win.
The Allies have another consideration: Halfway down one of the two roads in a place called Endau. If you get booted out of there, you lose regardless. For a brief time you’ve got air cover that lets you bomb one of the IJA’s dice and reduce it by one, but I can’t envision any way you can hold it longer than a turn, so that air support has to be in the right place.
It reminds me of the fight scenes from 1974’s Chinatown. There’s no seesaw battle where one guy has some stage blood trickling from one corner of his mouth after 15 seconds of boxing. It’s a broken nose, it’s a knee to the crotch, and it’s over. Sometimes I couldn’t believe how short the games were. The Allies also forfeit if you run out of turns, but I don’t think I ever had one go past four.
On my last try of the night, I abandoned my 50/50 success rate strategy of squaring off with the Japanese at Kampar on the Trunk Road and tried the “haul ass to Singapore” gambit instead, winning narrowly on my first try.
Experienced wargamers may find this a passing novelty, but this is a quick-punchout puzzle that could serve as a great entry point for the kind of person who thought they’d never pick up a wargame.
Students of the era will appreciate touches like seeing the Australian and Indonesian outfits IDed on the map; people who just want a lighting-round puzzle will get it, because it’s over in sometimes two or three moves if you don’t. The Malayan Campaign feels like it can easily serve either kind of player.
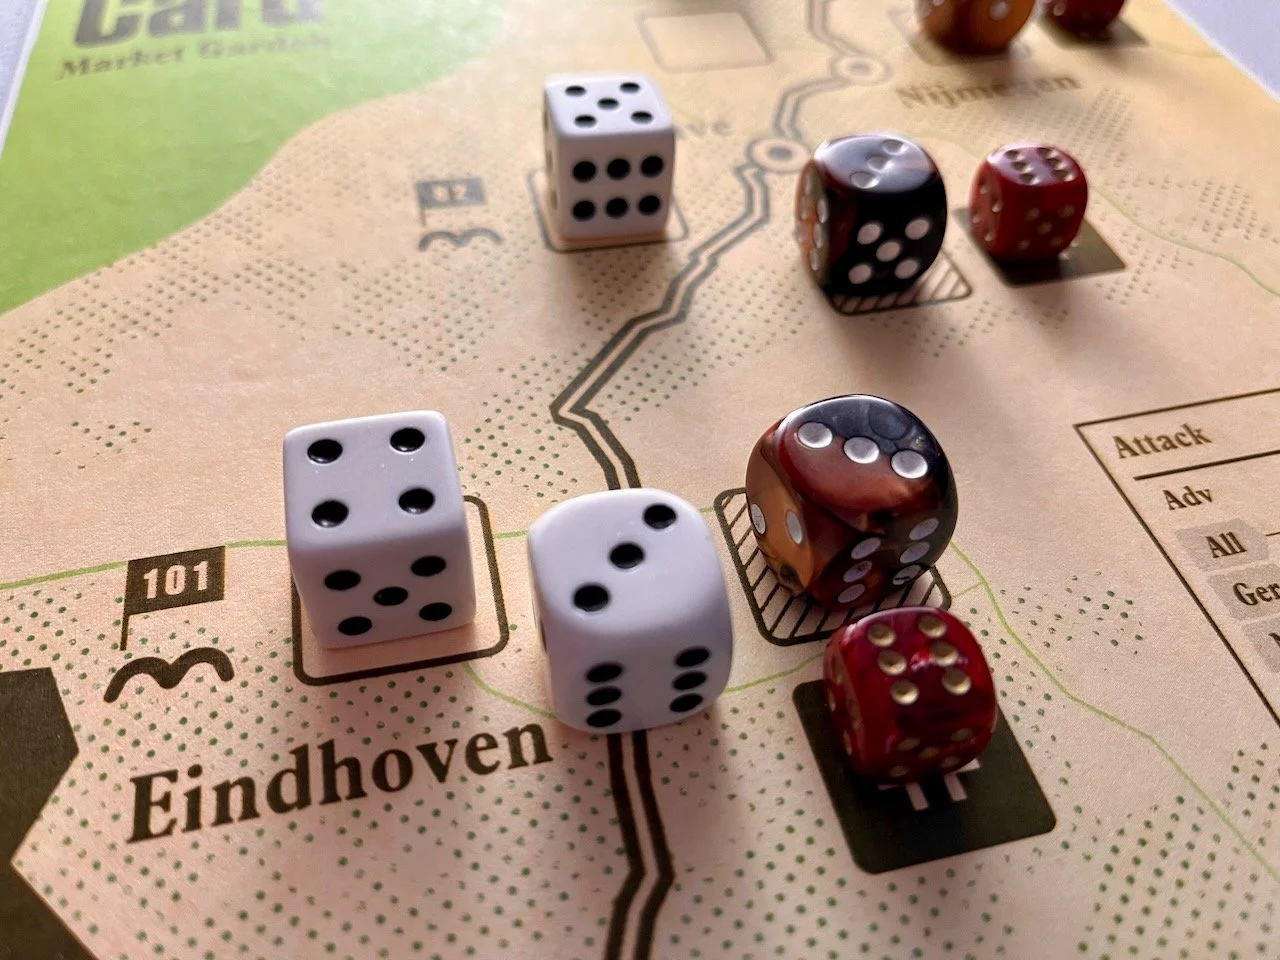
The next day I moved on to the second of the six maps: Market Garden, depicting the massive Allied airdrop into Holland that didn’t quite go well. Can I make it come out better? Yes. Unless I got a rule wrong, I had the smoothest command debut in the history of warfare. I rolled the American 30 Corps from Eindhoven to the critical bridge at Arnhem in a silky five turns.

Battle Card Market Garden scenario: Get outta the way losers, 30 Corps’ coming through
Sometimes these matches feel so slight that they evade coming into being, but these are billed as microgames after all.
This one has a variable setup, because the Allied forces at each of the four towns along the route were airdropped in, so the first step is finding out just how many men you have after the chaos of their parachute rides. These units have to get control of their drop sites so the 30 Corps can roll on through. Hold a town long enough for them to get there? The Germans get crushed when 30 Corps shows up.
But there’s a ticking clock and no room for snags. If you haven’t seized the bridge at Arnhem in six or fewer turns OR you lose any of your airborne elements in combat, it’s lights out, you’ve lost the initiative and the ability to control the route. The German dice start out weak but gradually reinforce if you don’t keep a foot on their neck.
This is spiced up by the fact that outside of the 30 Corps rolling through town, there’s pretty much zero help coming for the 101st in Einhoven, the 82nd in Grave or the 1st Airborne in Arnhem. Each have to attack enough to generate a table result that flips their assigned town to U.S. control. The 30 Corps can’t get in otherwise.
There’s one opportunity for the First Airborne over at the Arnhem bridgehead to reinforce, but other than that, none of the German garrisons you attack in any of the four towns can be totally removed by your airdropped forces. Each turn, the German die regrow a HP, reminding you to keep this thing moving at all costs.
There’s also an interesting wrinkle in the town of Nijmegen — the last stop on the road before the climactic bridge. You have no forces there. If the 30 Corps stalls on the road because the advance forces couldn’t control a town, it looks like you’ll have to waste a precious turn shifting your other airborne forces down the road to hit Nijmegen while the 30 Corps sits in their own exhaust fumes wondering what the hell the holdup is.
This didn’t happen to me my first two tries because my setup rolls and repeated attacking favored me, so I’m curious to see what happens the day my early luck runs out and I have to sweat out a time-costly move to secure Nijmegen while the clock ticks.
I’ve got four more Battle Card scenarios in the wings waiting to be tried: Operation Brevity, The Battle of Moro River, Operation Eidelweiss, and The Battle of Mortain, all of which promise to throw more curves and puzzles that are thoughtfully meshed with the inflection points of the actual battles. I’ll be adding those playthroughs on the blog throughout the fall.
Here’s my read on this series so far: This is an elegant and approachable path to a historical game that works just as well for somebody who doesn’t care about wargames but who will be lured in by the promise of a well-designed map, some dice, and a story-based spatial puzzle with some luck built in to evoke the abstracted battlefield. I could feel the trumpet of relief pierce the fog in the Dutch countryside every time I got to push my plain white die, representing 30 Corps, one town closer to the objective and remove a German die from the map. It felt more satisfying than it had a right to.
In terms of making high-value eye candy with jump-in-and-drive rulesets, Postmark Games seem like they have it totally dialed in. And speaking of design, I need to circle back and correct an omission in my Episode 98 preview: Postmark Games consists of Matthew Dunston and Rory Muldoon, who bring years of game and visual design expertise to bear on these affordable diversions. In addition, Nils Johansson gets graphic designer and co-game designer billing for the Battle Card series along with David Thompson. Strong work, gents.
Next episode the Fall Indie Game Haul continues with play notes and impressions on what’s in this little Pyrotechnics box from The Seahorse and the Hummingbird team.

Pavlov’s House Review: First Tries at a Valiant Defense
This is the exact balance of narrative evocation, detail, and weight I was hoping for as a fairly new solo wargamer.
This is adapted from the script of Episode 91: “Pavlov’s House Puts the ‘Fun’ in “You’re Fundamentally Screwed,” which you can listen to here.
This is the second time Sgt. Pavlov’s position has been targeted as he directs his squad and tries to stay alive on the north side of the House.
He’s scarcely spit the dust out of his mouth from the German mortar shell that hit the roof almost right over him before a sharpshooter, seeing him dazed and temporarily out of cover, sizzles the top hairs of his ushanka with a bullet.
To his left, Murzaev and Turdyev take down their third Panzer with their anti-tank rifle. To his right, Gridin is slumped over his now-silent mortar.

Pavlov’s House Solo Play Review: As goes the integrity of the walls, so goes the ability of the cats on the west side to do anything. They’re all suppressed by explosions.
This is my second, and geometrically more rewarding, tussle with Pavlov’s House from Dan Verssen Games, from the publisher’s popular Valiant Defense series — which includes Soldiers in Postmen’s Uniforms, Castle Itter: The Strangest Battle of WWII, Lanzerath Ridge and Guadalcanal: The Battle for Hendersen’s Field.
This series of designs offers history buffs and boardgamers with an appetite for accessible, middleweight game systems the chance to manage desperate pockets of WWII action against Axis powers that ended up meriting their own chapters in the era’s history, mythology and propaganda.
This is hard-pressed platoon-level action that forces you to think like a lieutenant — or a sergeant if the lieutenant’s already dead — whose unit is surrounded, whose ammo is low, and enjoy from the comfort of your chair weighing a string of critical decisions made in a world with a scant supply of second chances.
In the case of Pavlov’s House, designer David Thompson deposits you in the thick of it: The Battle of Stalingrad and the storming and subsequent defense of Pavlov’s House, a four-story apartment block where Sgt. Yakov Pavlov and Co. seized and held this do-or-die strongpoint in the center of the city, where key locations sometimes changed hands dozens of times in terrifying chains of assaults and counterassaults.
Thompson puts another historically grounded proposition in front of you: Since about 26 of Pavlov’s 30 men died in their initial sprint to the house and the ensuing welcome-to-the-neighborhood firefight, how do you keep it? The answer plays out across three horizontal sections of game board, which zoom you into three levels of building detail and pressure:
Regimental Command on the Volga
On the right, the board gives you a high view of the regimental command areas around the nearby Volga River, where you have to think like a general in a bunker and make tough decisions about how to support the boys in the house with Stuka dive bombers appearing regularly to disrupt your defense and staging areas: Do you ready some artillery? Get food and medicine on a boat across the river? String up comms lines that will give you more breathing room and help you more efficiently issue commands? Fix a cratered anti-aircraft site in time for the next appearance of the howling Junker 87s? You can’t do it all because the House is just one of many pots on the Russian command stove — and sometimes even when you do get the right adjutant to the right place with the correct order, a bomb swill swat your intentions off the board like a cat at play.
In my first game, my first-ever casualty was due to hunger because one of those Volga boats didn’t make it — a vivid connection point in play between your decisions in the right area and how it rolls down to the street-level bind those men across the river were in.
Plotting the German Squeeze on 9 January Square
Let’s pan to the middle part of the board; we’re looking at an aerial shot with the roof of Pavlov’s House, with its commanding views of 9 January Square, and the German armor and infantry that spawns on six tracks surrounding the House: Panzer 2s, 3s and 4s, Stugs, Scouts, Infantry, MG squads. This view lets you see where the Germans are pushing toward you, drawing cards from a deck of German actions that conjure not only the aforementioned units, but other lethal interference: bombings, shellings, snipings, all designed to wear you down and let the on-board units breach the house when the next Assault card comes up in the Wehrmacht Deck. If that happens, you’re done, there’s no final score to tally up.
Every so often, you’ll also have to pass a supply checkpoint. Not having comestibles in the house has immediate consequences, as I learned early.
The Action Inside the House
On the left board: An abstracted map of the apartment block itself, where you command Pavlov’s squad, represented vividly with counters, some of which even have period photos and names of the men who mounted the stand.
This is where you make a different set of decisions — informed by both your command-level panel on the right third of the board and what the Germans are up to in the middle — told in individual motion and lethality.
Using limited command abilities, you can hustle specialists around, get key dudes out of reserves and into play, shoot at encroaching German units, or forego move-and-shoot to set up suppression fire opportunities, refresh an exhausted comrade, or get heavier weapons and their required teams manned — a constant dilemma between the horizon of the near-term and the undeniable now, which both yell in either ear, with equal legitimacy. Everything is paramount.

The boys looking properly stern considering what’s coming down the pike.
I’ve played three times now at the basic setting, so here is the state of my sketchbook and impressions so far:
• For the most part, I found the rulebook a clear and useful conduit that connected the action on all three parts of the board. By my third play, I was still getting my clock cleaned, but running more and more of it on the reference cards without looking things up.
I’m thinking about some kind of formula here about decision space vs. roll-and-check deterministic elements and how they deliver story, and it all feels wonderfully balanced on the whole. There are a couple minor points I’m still having trouble with, but the curve was generally not steep. I used to have to take a break between turns; now I’m running several turns smoothly, with the exception of a few German deck questions that still keep bugging me. But on the whole, I feel I’ve picked a wargame with the right weight for me.
• I love how the rationing of actions and pressure to act ripple across the three sections of boards, the shit rolling downhill to the nervous systems of whoever’s still alive or able to man a gun inside the House. I’ve been experimenting with my opening moves inside the House itself and with command focus on the right half of the board, finding multiple paths to explore within those first few critical days of battle. Deciding when and if to bring in heavy weapons teams vs. high-stat individual shooters vs. bonus-granting leaders, overlaid with what you’re focusing on at the regimental level, is stimulating without being cumbersome.
• In my second game, I survived and the held the house, losing just two men, but scored dismally on points because I was too timid to stage counterassaults with the Storm Group options that come up right after the Resupply check. I’d built up my comms on the right board by sending my Russkies up telegraph poles, plus rushed my whole officer command team into the House, which also widened up the range of responses I had to depressurize the German advances on the street level.
I tried the same thing in the third game and simply got bombed off the map. On the right, my AA gunners just couldn’t seem to hit anything. The Stukas ripped everything apart, forcing me into a reactive state where I was nervously chasing them around with a dustpan, trying to ready sites that they doggedly hit and again; at one point, I had zero functioning staging, artillery or AA sites anywhere on the east side of the Volga, freeing the Luftwaffe up to blast my Sisyphean attempts to establish comms and threaten my regimental HQ.
At the House itself: German artillery dudes must have been given extra-good methamphetamine that day, because they dropped every size shell they had right where it needed to be, peeling back the squad’s fortifications like an onion, then pounding the soft flesh within into an almost constant state of suppression that meant they could do little except shiver behind piles of brick and get the occasional rifle shot off.
But this was fine. It was better than fine, because the story welled up out of the bedrock of the game easier and easier each time, the game’s charms distilling out bright and clean.
This Game is Earning its Laurels and I’m Going to Play the Shit Out of It
Three years ago I would have told you that Warhammer 40,000: Conquest the Card Game was my unimpeachable #1 of all time, but in my late mostly-solo career, I’d have to tell you that Thunderbolt Apache Leader has taken that spot. I can scarcely imagine what would dislodge it, but I will say that Pavlov’s House is delivering everything I wanted to get out of it and is going to be seeing heavy play this year.
Thunderbolt Apache Leader passed — or failed, depending on how you look at it — The Hygiene Test. When I was on Day 2 of a mission, this game was so engrossing that I did not want to bathe or eat. Nothing I’ve played, wargames or otherwise, in the past five years was so engrossing.
But Pavlov’s House earns a different, but laudable, medal: War Before Breakfast. By Game 2, I’m waking up and walking right to the table to play out the rest of a game. Before anything else except coffee. It also wins the Resident Guest award: I’m currently not putting it away in between games because I know I’m going to be setting it up again within the next 12 hours.
That’s a winner. That’s something that will see heavy play for the next few months. That’s your money’s worth.
There’s only one bittersweet note: The knowledge that this game has been out for seven years and I’m just now getting to it. Scroll to any memory: looking for bullshit at Lowe’s on some Saturday, eating a so-so meal with people who don’t say anything interesting, binging some series whose name I can’t even remember…I could have been defending the House this whole time.
Within the game and without, the tragedy of misallocation will always haunt you.